Scratch-built Iron Man themed lightsaber

IT BEGINS

This starts when I went to Disney with a friend to see what sabers they had on sale. Zero. Not a single one, not even for display. Really disappointing. While legacy sabers aren’t the best, some of the hilts are really nice for the price.

But that’s ok, I can make them a saber. And it’ll be better (neopixel/proffieboard). And full custom, completely from scratch. And it’ll be themed to their favorite character.

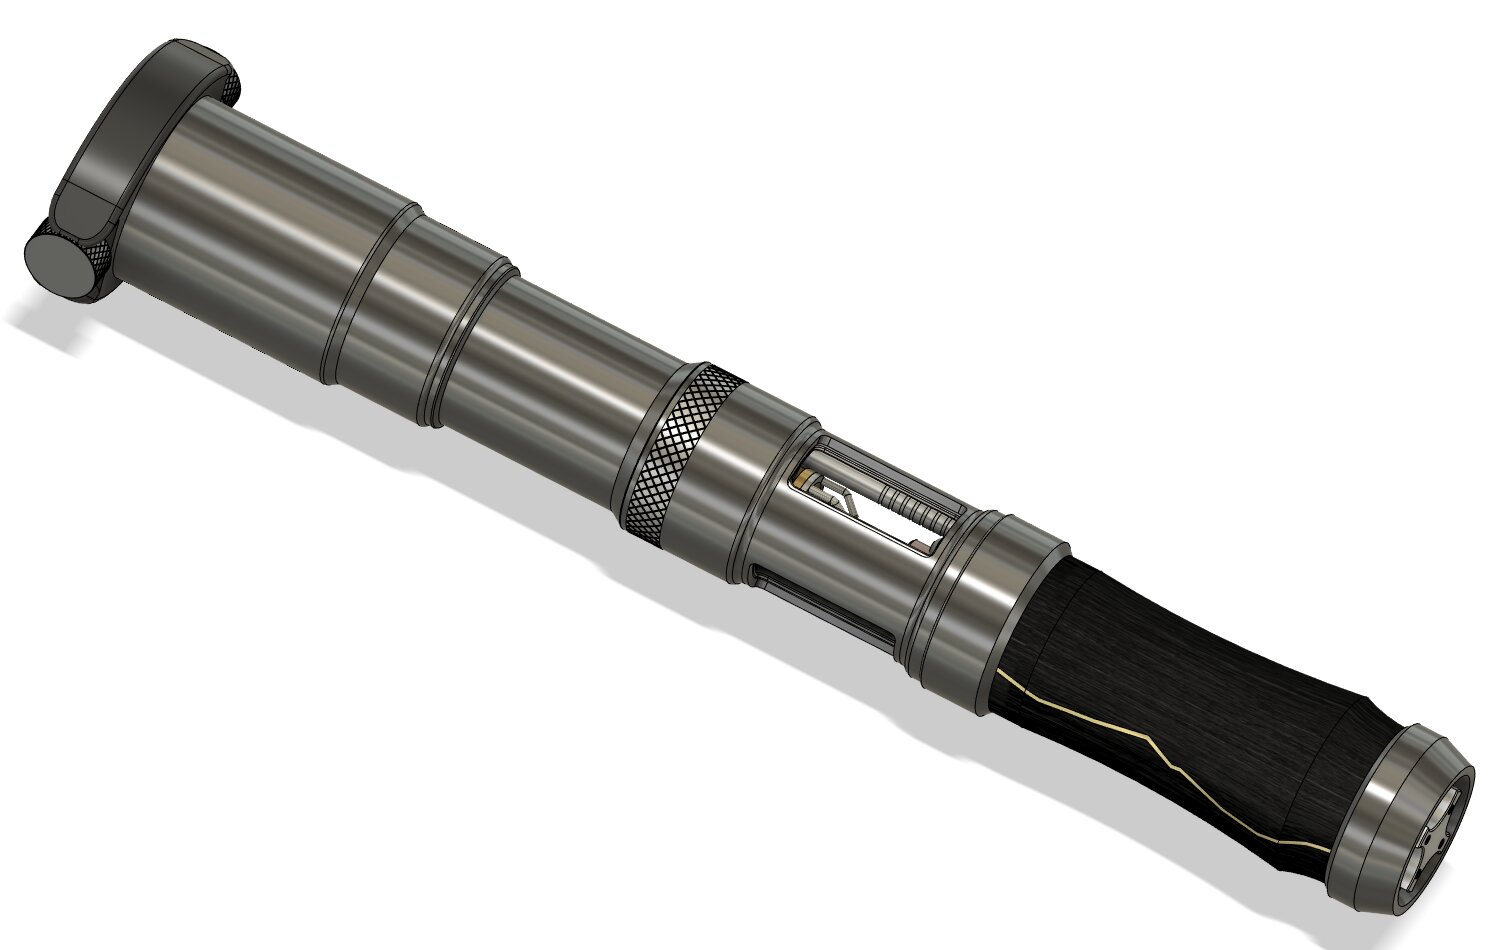
So I made a completely custom, from-scratch Iron Man themed lightsaber. And I got it done almost 1 year later to the day, about ~12 hours before I left for my trip!.

The pics

The parts

Electronics:

  • proffieboard v2.2
  • 18650 battery
  • TCSS 28mm speaker
  • GX16 4-pin connector

Blade

  • ws2812b 144/m LED strip
  • TCSS 1" thin wall (clear), diffuser
  • packing foam & gift wrap
  • GX16 4-pin connector

Hilt

  • 1 1/4 sink extension pipe from home depot
  • 3d printed exterior
  • lots of sanding & paint
  • single ws2812b accent for the button
  • small 6mm momentary switches (x2)

Some odd choices

No set screw – I really dislike the idea of retention screws. If I’m traveling with the saber and have to assemble on the spot, no way I want to mess with a tiny set screw + allen wrench. I really like how the Disney sabers twist & lock, so I created my own version of that. You just insert the blade & twist it. Magnets (and friction) hold the blade from accidentally untwisting, and screw-heads keep the blade in place (think frankenstein’s neck bolts, which get captured into slots in the plastic).

The GX16 connector – I played with a lot of connectors (4mm bullets, XT60, XT30, MR30 3-pin). Bullets are nice and cheap, but very hard to make secure in a small 3d printed plastic base. I went with the GX16 which worked well. It’s nice to have a premade connector I can just drop in, but it’s also a little bulky and constraining on the design. Next saber will use (2x) XT30’s and I’ll try using epoxy to secure them.

No pogo pins – I love the idea of POGO pins & pcbs, but they’re fairly pricy. GX16 costs ~$1.25. A pogo set costs $15-20 (factoring in shipping), and there’s fewer places to get them. Plus, I needed 4 pins on the blade (more on that later).

Blade doubles as kill switch – This is why I needed 4 pins on the blade. The blade acts as the kill switch (or more aptly, the enable switch). All power flows through the blade back into the hilt, so when you remove the blade it also disconnects power. No secondary kill switch to forget. Works really well, and just requires one more (low-current) pin.

Removable chassis - I wanted the chassis to slide right out, no tools required. But since I’m not using pogo pins or spring contacts it had to be all in one; from the top physical connection to the blade, all the way to the bottom speaker. This made things really complicated, especially with buttons mounted on the chassis but pressed “through” the hilt.

Lessons learned

Last saber was designed in sketchup, and sketchup does not like fine small-scale CAD (lots of non-planar faces). This time I used a proper CAD (onshape)… HUGE DIFFERENCE! Worth the time learning it, I really couldn’t have done this in sketchup. I also tried openscad, but you really can’t do this in programming; you need some UI, there are some complex things going on here.

I also had to design each piece a few times over and over, mainly as I learned better strategies for modeling. But it was worth restarting each time, since the more you build on something the more the underlying flaws bite you.

The exterior design was really hard. It’s simpler to figure out “how do I get A to connect to B”. It’s much harder to figure out “How do I make this look cool & less stupid?” But I love the misc faux wiring panel on the back of the handle, it’s my favorite part.

The paint came out amazing. Kudos to “Frankly Built” on youtube, I used his recommendations for spray cans and it’s awesome.

The arc reactor button is my favorite part. It’s just so cool to have it glowing right in the middle, and very satisfying to press.

It was really hard to wire everything up. I tried hard to keep things clean and orderly, but there’s just too many bulky wires. I was using what I thought were 28AWG, but they were probably closer to 20-22 AWG which explains the difficulty. I just got some 30 AWG in, and those are TINY! Those would have helped a ton.

Next time

I’m going to design a minimal/modular chassis; the chassis itself will be contain just the battery/proffie/speaker. The buttons & accents will be permanently installed on the hilt, and I’ll use a multi-pin connector to connect the two. This means no crazy through-hilt button pushing, no restrictions on chassis size/shape/diameter. It can be much smaller and simpler. I avoided this last time since I didn’t want to have to design 2 completely separate connectors (blade → hilt → chassis), but I think it’s worth the effort. I’ll need ~7 pins, but that should be fine (probably an XT30 + duponts for the rest).

This also means the same chassis can fit multiple hilts. Currently the all-in-one chassis requires a saber of the exact same length, with buttons in the same spot. The modular chassis should work with any combo, even varying number of buttons/accents.

I used a clear TCSS blade + diffuser. It’s brighter than the milky blade, but less even (although it’s also badly packed… I was in a rush!). I’ll probably go with milky blade + diffuser next time.

3 Likes

This looks amazing!! I love the candy-red paint you did on the emitter…what kind of printer are you using? I’m imagining either a resin printer or lots and lots of sanding to get such smooth surfaces.

I really like the slim/minimalistic design. Makes it look like something that TS would actually have designed. Also the back-lit button looks really cool. I am wondering how the button actually works…is it some sort of rocker switch that tilts to hit either button underneath? How do you press both if needed?

Did you cut the threaded nut off the GX-16 connector? I’m guessing the extra pin in the blade is cutting battery positive to the board? That is a really neat idea. Too bad all my sabers so far use pogo pins. :frowning:
I’d be interested to see a cross-section of the CAD model if you don’t mind sharing. It’s always interesting to me to see how other people solve problems.

Thanks!

Printer - CR-10S for most of the big parts, and an elegoo mars 2 pro for just a few high-detail things; the arc reactor button, the front of the handle (which I call the belly plates), and the back part of the handle (the misc wires). All others were sand/prime/paint/clear. I did spend a decent amount of time on them, but not as much as I would have thought. They’re not mirror finish, but after all that work you realize almost nothing store-bought is smooth (even professional paint on metal) and call it a day. Came out great.

Paint is rustoleum primer, rustoleum gold (for the gold pieces), then the same thing with duplicolor metalcast red on top for the cherry red. Metallic parts are kryon metallic dark metal. That stuff is bad… comes out with chunks/grains of sand. Not sure what’s going on there, but it’s not smooth at all. Clear was duplicolor 1k clear.

The button was one of the harder parts. You can press the top, bottom, or both. There’s just mini tactile buttons (6mm low profile) under them. However; the buttons are on the chassis, and the arc reactor is on the hilt. So they have to slide past each other, but meet up and still allow contact/pushing. Thankfully it works great.

GX16: yes, cut off the nut and the upper housing leaving just the pins and surrounding metal. Saves a ton of space and works well, but I had to get creative with how to secure the connectors in plastic. Plus technically they’re a little underrated I think (about 7 amps?). Next time I’m going to try xt30. And POGO pins really are the way to go, if there were more/cheaper options.

The core is the metal drain pipe (yellow). The outside is the 3d-printed shell, and inside (blue) is the chassis. The arc reactor is the larger gray part on the right. You can see how the arc reactor touches a (light blue) button-pushing-thing, which makes contact with the tactile switches (gold) that are inside the pipe. There’s just enough play to allow removal/insert the chassis without binding, but still have solid contact when pushing buttons (no rattling, no play). There are two really strange (3d printed) springs to keep tension on the button; I could not find small enough springs to work in the space, so basically I printed 2 very small 5mm diameter hoops that get squished when you press the button. Very finicky, and it occurred to me after that I might be able to make a custom spring out of a paperclip. And not shown is the single WS2812b neopixel that sits in the middle of the chassis facing out. The light blue button-pushing-thing also serves as the diffuser (printed out of clear PLA, came out pretty neat).

Like I said, next time I’m going to try a modular chassis with internal connector. That should allow using permanent buttons on the hilt and skip the complicated assembly alltogether.

Got a link to your builds? Would love to see some.

Well, your painting turned out better than anything I have ever painted lol. I can never seem to get it to be smooth with spray paint. Though about getting an airbrush a few times, but never could justify it when other people get good results with aerosol cans…

I really like the button design…I’ve thought about doing a rocker switch but could never figure out how to press both at once if it is pivoting at the middle. Looks like you came up with a good solution to that problem!

Realistically with a 2-strip blade the GX16 should be fine. I think for 2 colors you are right there with two strips:

Using the sink-tube core is a good idea. I see a lot of people printing sabers, but they are just solid plastic that will realistically fall apart if you (or a child, especially) gives it a good thwack. So you get the benefits of printing the outside while also having the strength of a metal core…nice!

As for my builds, I have a couple posted here:

I am currently working on my “unicorn” saber…for the last year and a half.

I usually have good success with ball point pen springs cut to desired length. If you need a different diameter, you can re-roll them on a drill with bit of choice :wink:

Buying straight spring steel is fairly inexpensive, why re-use ones that have already been rolled?

¯_(ツ)_/¯
Buying straight spring steel is the best answer.
I was just getting by with what I already had.

How’s the rules? How much smaller diameter you have to roll to get the desired final diameter?

Not trying to hijack this thread. But I was using them in these printed plunger buttons.

2 Likes