There are ways. It’s just a matter of finding something to trigger the scan. Some people have tried doing it when you turn the blade on, some people try doing it in “next preset”. Either way, it requires some minor modifications in your prop file.
A blade with zero LEDs might cause problems. (divisions by zero and such) I would just use a style like StylePtr<Rgb16<1,1,1>>() instead. ProffieOS isn’t going to turn the power off, because the blade is not Black, but the LEDs won’t light up, because even with dithering, this still turns into Rgb8<0,0,0> before it’s sent to the blade.
The thanks is most appreciated. Sometimes people ask if they can buy me a beer, donate money or do something else for me, and I always tell people to pay it forward instead. Help someone else, update a wiki page, make an instruction video, or something else that will help the community. I try to help as much as I can, but I’m only one person.
I hear ya Prof. And will do my best to pay it forward as you suggest.
In all this experimenting with blade plug charging, blade IDs and all the rest of it, now that I’ve started to get my head round it all, it’s just suddenly occurred to me - I’ve been unwittingly building this facility into all my sabers for the last two years! The last preset on all my hilts is a battery level monitor with &style_charging as the blade style. All I ever had to do was wire up a blade plug with a charge port in it, switch the saber to that preset and it would just work! That said, I’ve learned a load about Blade IDs this weekend which is all useful knowledge and which I’m certain will improve my sabers in the future.
Bugger - I think I’ve just found the fly in this ointment…
Charging relies on the fets being active, but on hilts with lots of accent LEDs, I find it’s good to use the #define IDLE_OFF_TIME 15 * 60 * 1000 line to shut down the accents after 15 minutes. This of course is no good for charging as it stops the charge happening.
So the next question: can you exempt an individual preset from that define?
Or aternatively, can you incorporate the 15 minute timeout into the accent LED code on each individual preset?
Looks like the is already such an exception for &style_charging.
I can add a ChargingStylePtr<STYLE GOES HERE>() that would let us us this exception for any style, but for now, try &style_charging.
The exception code only looks at the the first blade, so the rest of the blades can be whatever.
Ah OK. Thanks Prof.
Yeh I’ll use &style_charging then.
The only minor issue with that is you can’t edit the associated blade style. I’ve built a blade plug with some indicator neopixels in it, but they won’t light with &style_charging as they would count as the first few pixels on the blade, and that blade style just lights a band of pixels further up the blade (unless the battery is really flat!).
With blade ID obviously it can work as you can set the pixel count for the second blade. I just thought it would be nice to have the option of a blade preset that you can just navigate to without opening the hilt to reboot. Then the blade plug can be set so it’s red when the battery is low but slowly turns green as it charges.
If it’s OK, I’ll add a feature request in GitHub (if I can figure out how to do it! LOL!). Low priority though.
ChargingStylePtr<>() is now a thing on github. (Although I have not actually tested it.)
You could use it like: ChargingStylePtr<Rgb16<1,1,1>>(). Of course, any style will work, but ChargingStylePtr will disable on/off, so it should be a style without ignition/retraction.
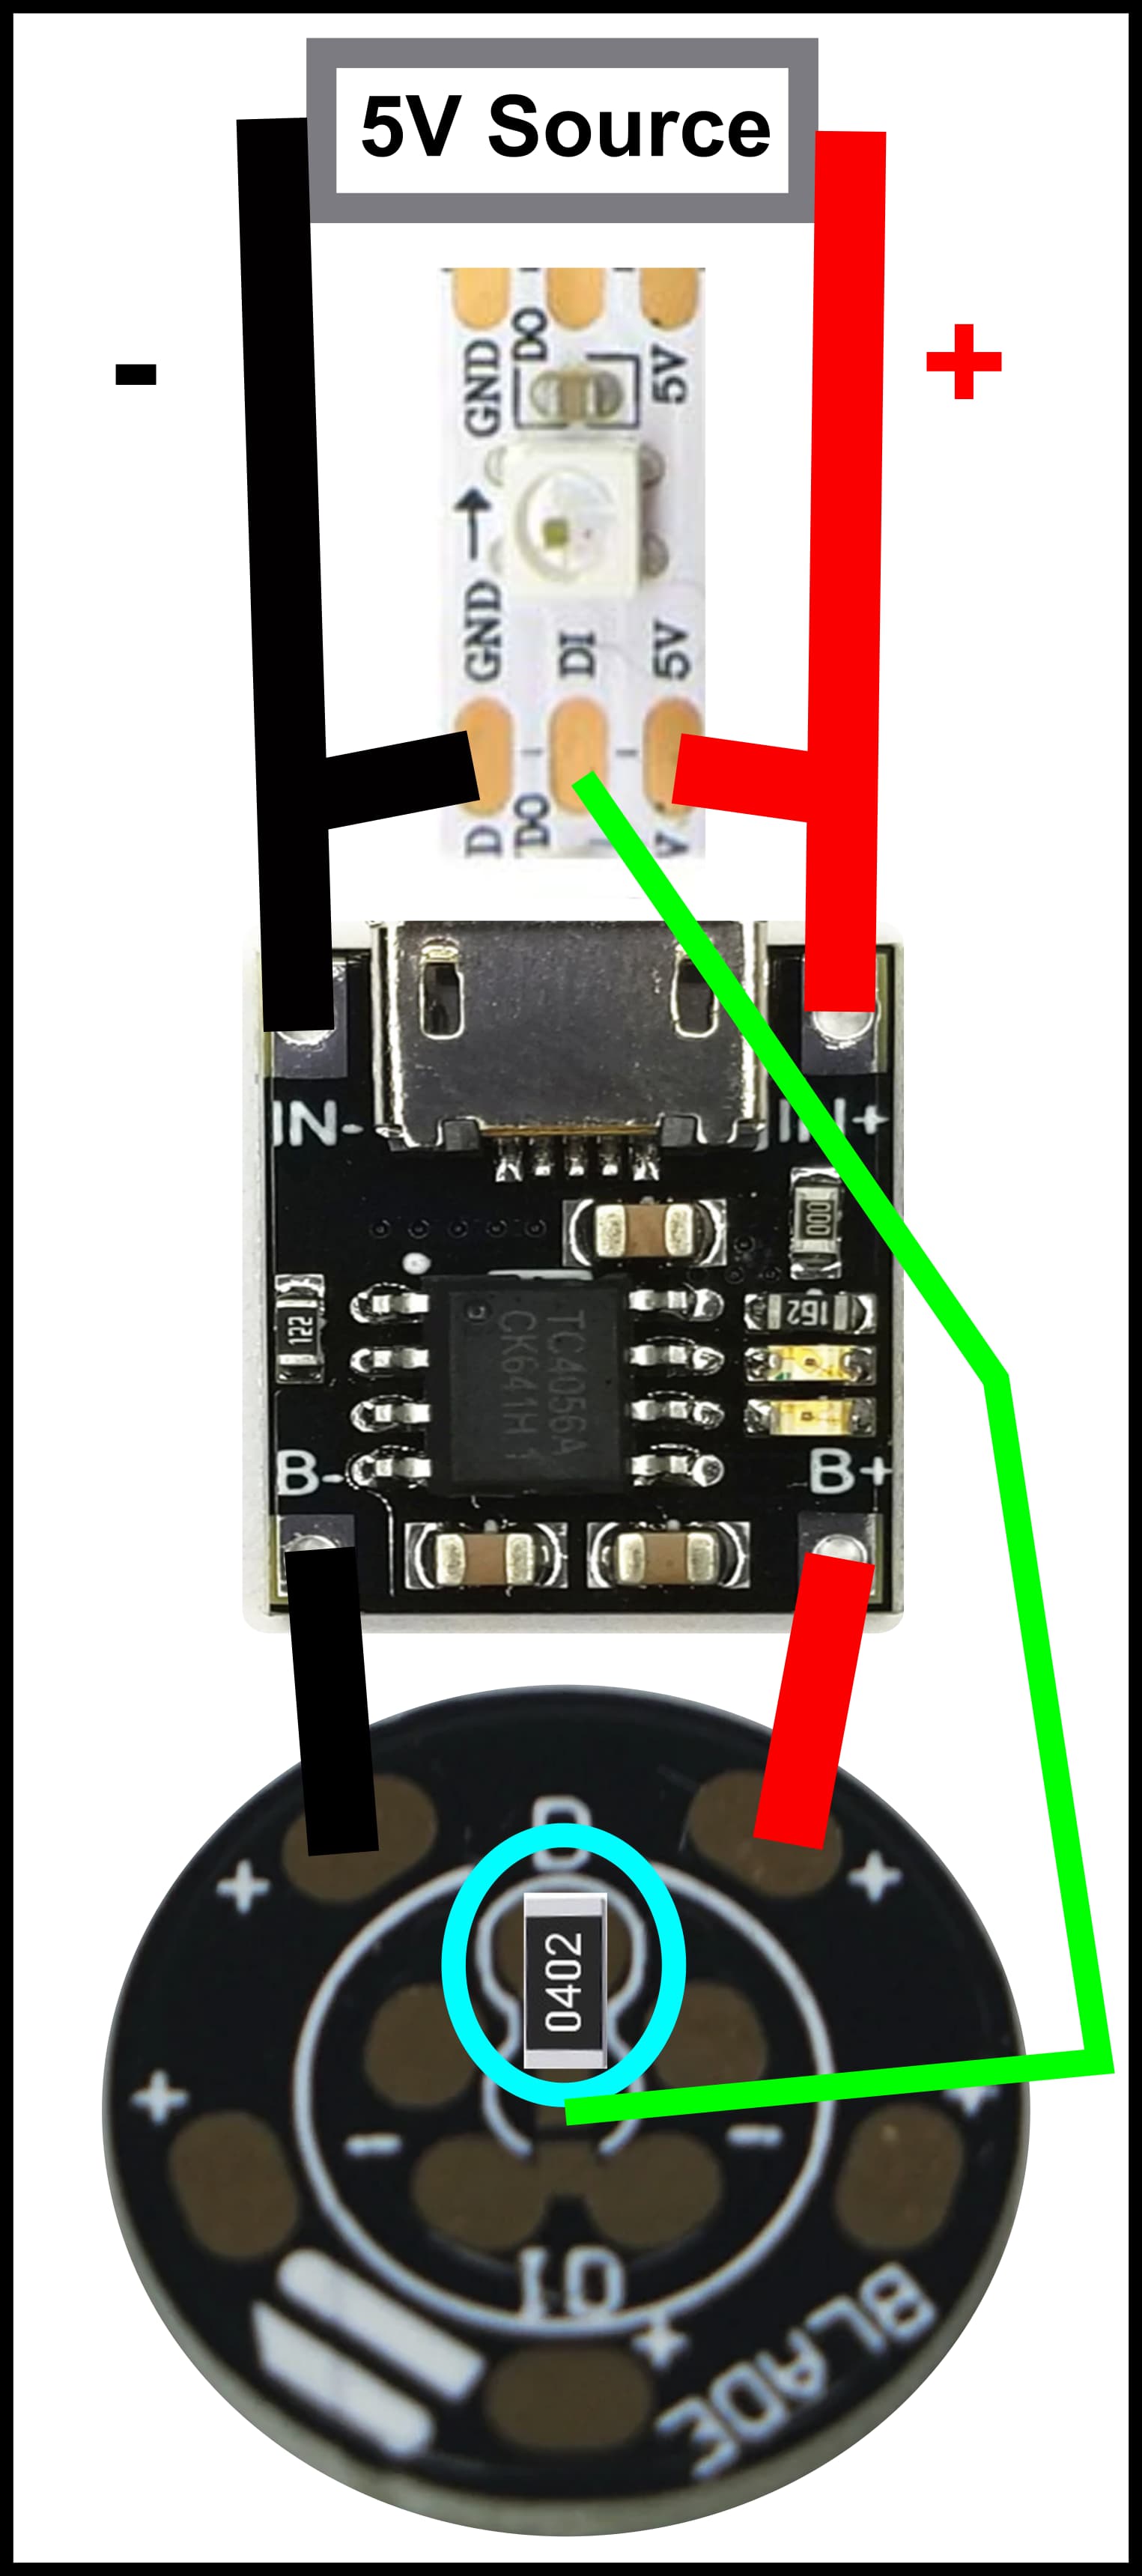
I’ve been thinking and measuring and I think we can make a charging plug that actually displays some lights. Since WS2812 can tolerate 5V, we can wire them before the TC4056, use the dataline, and then set the blade to a &style_charging preset which actually codes in length and color the battery level. I wonder if it will work since the line will be pumping 4.2V probably, though. For the rest, I guess the wiring is right.
I think it’s even better than this in terms of ease of achieving this What you’ve described is basically what I’ve been doing, but I didn’t use any other circuit board - I just made a blade plug with charge port wired to + and -, six LEDs wired to the same and the data line to the Proffieboard. I used blade ID to ident it with the correct pixel count, then used Fett’s battery level mix bladestyle but with a pulse on the low level side. (I’m at work as I write this so can’t remember the exact line, but it was very simple).
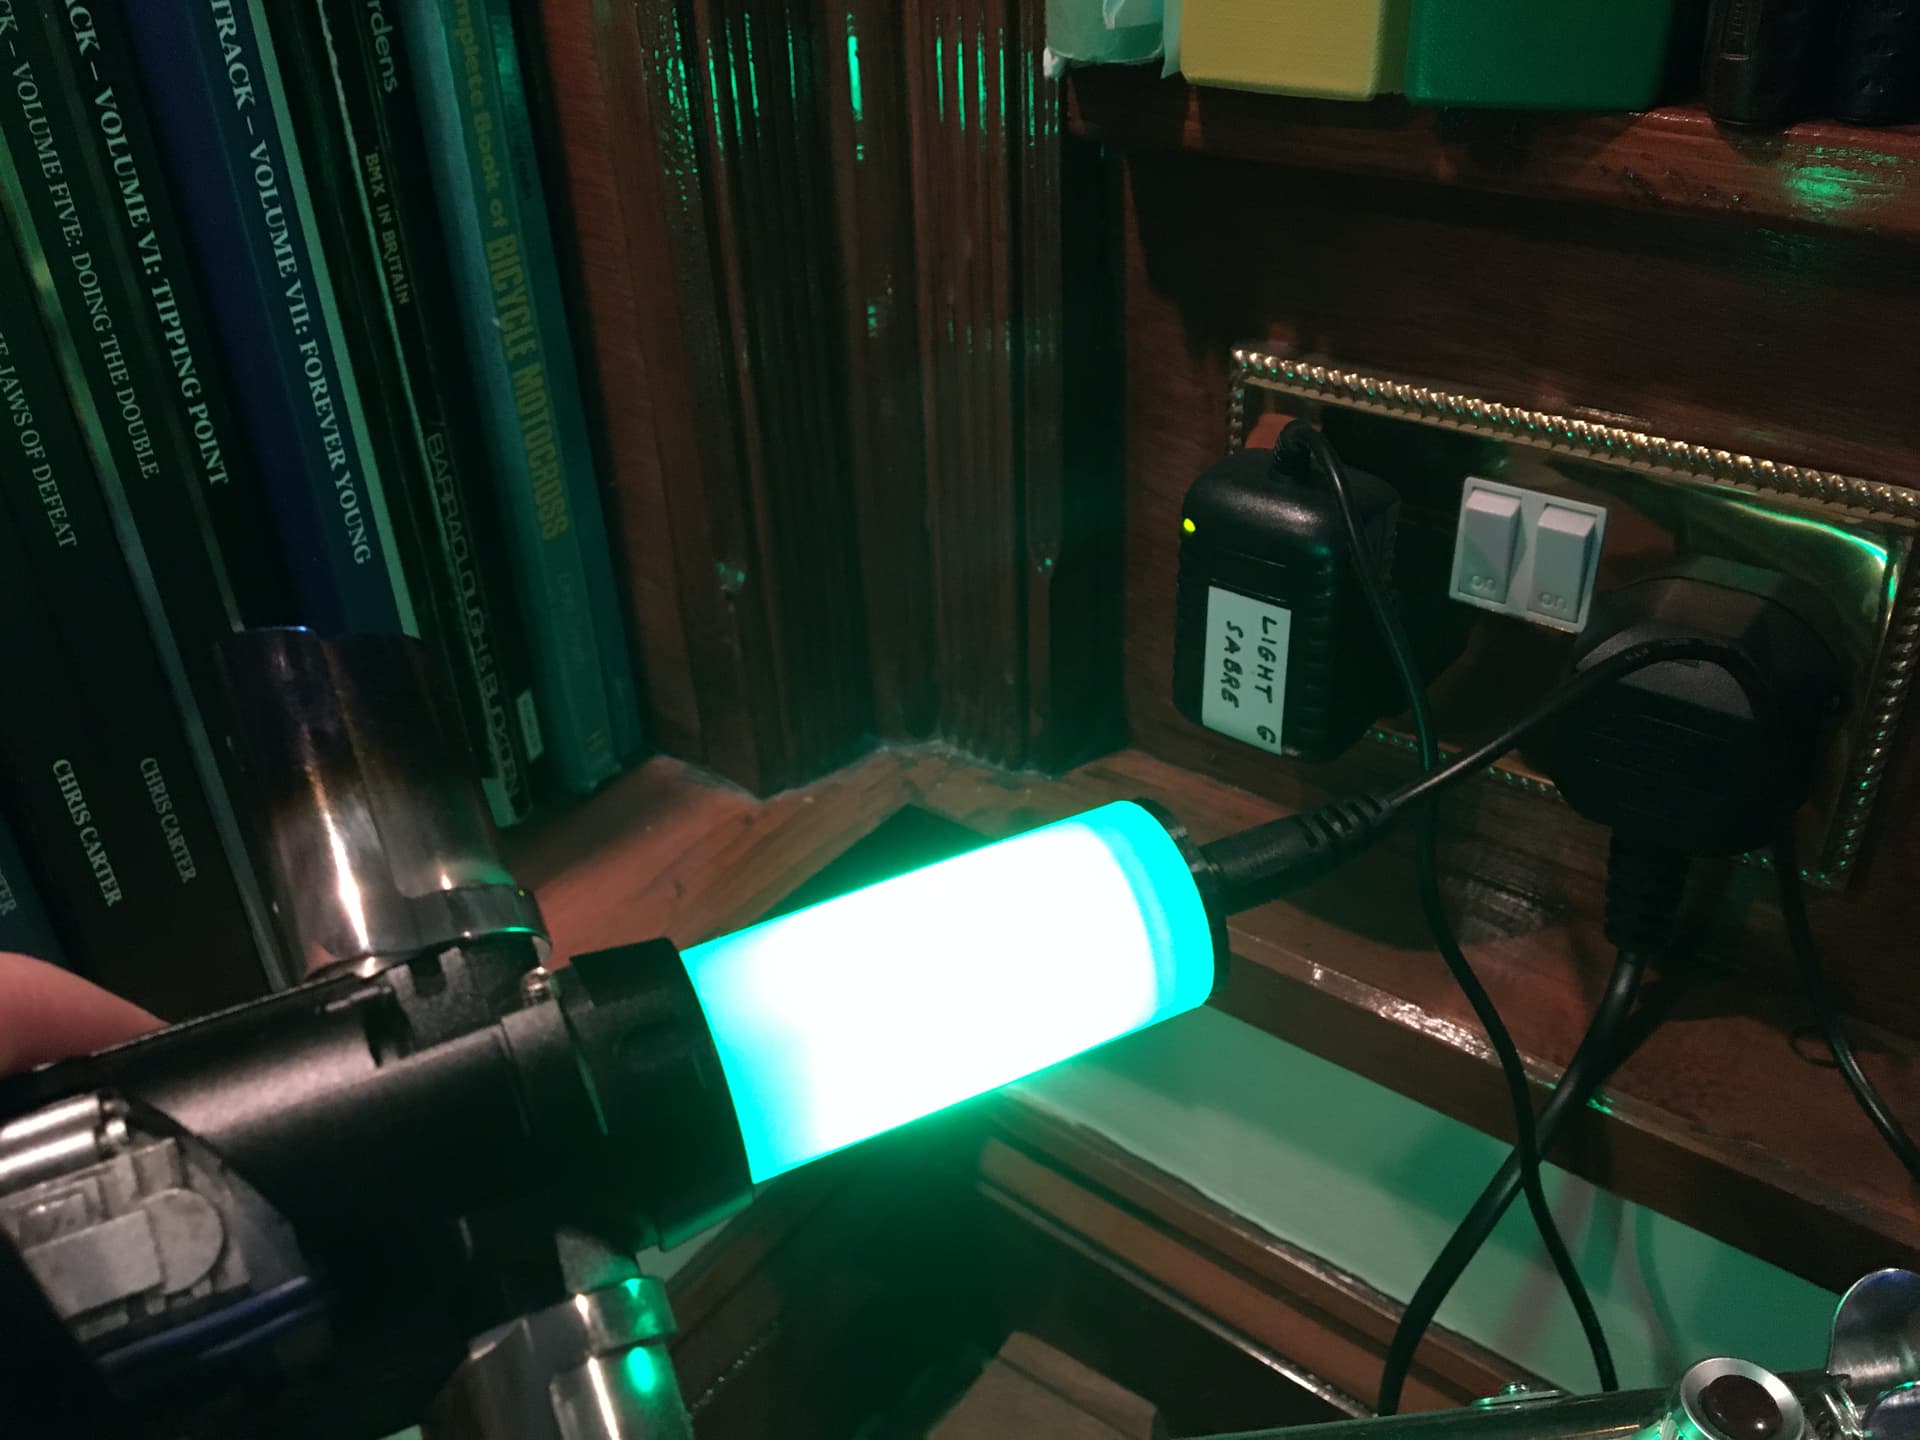
The result was that when I put the battery on charge through the plug, to begin with, the plug pulsed between amber and green, then as the charge increased it turned solid green over a few hours.
The only issue was that when the plug was green, the light on my charger was still red, but that may be because I didn’t leave it quite long enough. (It was late and I didn’t want to leave it plugged in overnight).
Prof,
Sincere thanks for adding that charge line exemption. I’ll try it out later today. Forgive my ignorance, but do I just search for GitHub ProffieOS, and is that basically OS 6.7 plus a few mods made since that OS’s main release? (I normally only download formal releases from the fredrik.hubbe.net website, so I don’t really know my way around GitHub too well).
So I downloaded the latest 6.7 from GitHub with the Prof’s charging style timeout exemption added, and it works perfectly. You can now build a charging bladestyle for your charge plug using Fett’s Mix<BatteryLevel and it will represent the charge state throughout the charging process.
Blade ID is a nice addition to make the saber skip to the correct charge preset, but it isn’t necessary and you can just cycle to the charge preset manually if you want to keep things simple.
What I was surprised about is that the illuminated plug doesn’t appear to affect the charging process. Furthermore it appears to correctly show the state of charge of the battery rather than the voltage level being applied by the charger. I’ve used a style that has the plug pulsing from yellowy-amber to green when the level is low, slowly changing to solid green when it’s charged.
It also doesn’t seem to prevent the battery reaching a full charge. I left it until the charger showed green and the battery returned a voltage of 4.17 volts using SA22C’s battery voltage announcement.
If I had to be ultra picky, I’d like the Mix<BatteryLevel curve to be slightly different as the full charge side of that mix seems to be reached before the battery is absolutely fully charged - but that might just be a question of experimenting with different charge presets.
Sincere thanks again to everyone who helped make this work, particularly, it goes without saying, Fredrik who patiently tolerates my whims when I get these ideas in my head. I am in your debt.
You should be able to use Scale<> to skew the mix to be a little more sensitive.
You can see in this On-Demand Battery Level layer, I increased the upper level on the scale to exceed 32768 up to 35000 to “fill” the blade a bit more when battery is at the high end. tinyurl.com/2lct7ebg
Many thanks Brian. I’ll do some experimenting. I’m more looking at the colour differences as I want the effect to be full blade (as the charge plug is only a few pixels long), but I’m finding it turns full green at too low a voltage.
Thanks for the notes though - I’m starting to get my head round all these features slowly but surely.
One other thing that occurs - is there any reason you couldn’t make a charge plug with a bigger, but same voltage, battery in it that you could use to charge the saber through the emitter when you’re out and about? Would be useful for events with sabers with fixed batteries. But there’s a voice in my head telling me it wouldn’t work as intended, but my battery theory knowledge isn’t enough to figure out why.
If you just plug in a battery directly, there would be nothing to limit the current, so you could get 100A going, which would either trigger the protection circuit or melt something.
Also, by the end result will be that both batteries will be 50% full, which is not super helpful.
With a voltage booster and a proper charge circuit, you could get a proper battery charger, which would charge the battery at at fixed rate, and keep charging until the battery is empty.
Probably the easy thing to do would be to start with a cheap one-cell USB battery, then add a 5v charging board. Take everything apart and then mount it in a blade tube.
Although, it might be cleaner to just put a USB-C plug at the end of the blade tube and use any USB charger to battery for charging.
I would put two 21700 batteries in series, then use a voltage regulator to get 5V, add a TC4056 and that should do it. I don’t know if there’s a small voltage regulator that can take from 3.3V to 7.4v while still keeping a 5V output. Or may be a down voltage regulator that does 3.3, then a booster to 5V and then the charger circuit. That would be enough to really deplete the external batteries. But keeping it high current for charging might be difficult.