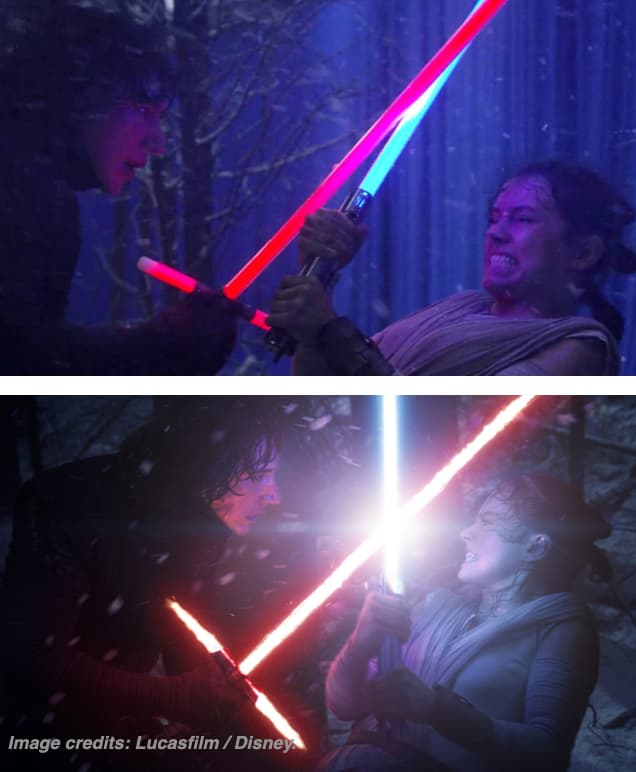
In order to understand how best to shoot lightsabers, you first need to separate what you know from what you want to see. What we know is that a replica lightsaber is a tube filled with coloured light. But what we actually see in the movies is a ‘tube’ that is actually white - the only clue to the blade colour is the colour of the glow and the reflections on the blade’s surroundings. An example of this is shown below.
The prof has already touched on the main points, but what this boils down to is that as a general rule, the better the camera, the worse it is for filming lightsabers. This is because high-end cameras are capable of resolving higher contrast than cheaper cameras. Better cameras also include lots of gadgets like HDR that effectively force detail into parts of a photo that would otherwise blow out. Assuming you wnat your photos to look like the sabers in the movies, this is the last thing we want when filming lightsabers, because detail in the blade tube means we see the blade colour on the tube itself which tends to give the game away that it’s just a plastic tube - when what we actually want is for the tube to blow out white so that we only see the colour on the glow.
That said, there are certain higher end camera features that we do need, and they are the ability to lock exposure parameters. This means we can set the exposure correctly for the surroundings in the shot, which then means the lightsaber blade, when lit, will overexpose without the camera trying to correct for it. This overexposure is what will make the blade look real.
I actually made a short video all about this here:
And if you ever buy a Sabersense lightsaber, it will include a fun little magazine which also includes an article all about it. This comparison shot from that article shows what I mean about what we know versus what we see:

Tha last thing, which again the prof touched on, is that you can utilize reflective surfaces to your advantage. For all my lightsaber demo videos on my channel, I shoot them on a leather topped desk which gives enough reflection to show blade effects, but not enough to show the unlit blade. When combined with some simple camera tricks, you can create quite realistic videos like this one:
Lighting for that video, and indeed for all my demo videos, is a combination of natural light through a window camera-right, a full white computer screen as a backlight above the top of the frame, and a 650 watt tungsten light placed camera-left and back a little bit (kind of over my shoulder) with a full CTB gel (to match the daylight) and a double layer of spun to diffuse and soften it. The camera is nothing more than an iPhone 6s shooting in 1080p HD with a soft filter over the lens, but with colour temperature, ISO and shutter speed locked with a simple app.
But to take it back to the original post, in your case CWG, it sounds like your devices are giving too much flare to your blades. Obviously I don’t know the finer points of how and where you’re shooting them, but I would say that if you can increase the ambient light in the room, you will effectively reduce the difference in light level between the blades and their surroundings which should reduce the flare and the degree to which the blade blows out. Like all these things, it’s a balancing act, and you just need to experiment to find the sweet spot that gives the results you’re after.
Hope all that helps, and if all else fails in terms of stills photos, I offer an inexpensive service on my website to add realistic blades to your photos here:


