Hello there,
This is my current project of labor and love. Now that I’ve finally figured out how to optimize the micro kill switch to work for neopixel builds and utilize the other micro kill switch for blade detect
(Both of which are thanks to profezzorn and a couple other people here) I can finally start installing this beauty.
Here are a couple videos I made showing just how well put together this saber is. I hope you enjoy 
Disassembly video
Reassembly video
Link for hilt (sold out)
1 Like
This will be the ONLY video I think there is on this, so thank you!
Greatly looking forward to the details and things you find work best throughout the journey.
2 Likes
That’s great tear down! I’ve never thought of a hinged component with rubber bands to hold the board… what a cool saber 
1 Like
You’re very welcome. I hope my time with this hilt helps someone out there.
Here’s a video I made to show the results of the micro kill switch testing.
It works beautifully as long as you power off the blade first but if you just flip the switch then there is still some residual power left on the blade and it’ll be a faint color until the battery is disconnected.
As far as I’m concerned this is more than acceptable and I’ll likely roll with this for the install.
In case anyone is curious I’m going to use the copper kill switch located below the crystal chamber as a kill switch to cut power to the proffie v3.9. The other kill switch located below the control box will be used as a blade detect feature. What I’m going for is if the kill switch under the control box isn’t in the on/ up position then it’ll simulate a “crystal chamber not engaged” setup where nothing will power on until the kill switch is made.
Thank you, I’m happy to hear you enjoyed the video. I will admit the only thing I don’t like about saberkraft is their insane lead time but everything else is absolute gold.
I ended up buying this one second hand from a guy on FB since my current preorder is looking like it may never ship out so I didn’t want to miss out on this saber and I’m glad I didn’t hesitate to buy it
1 Like
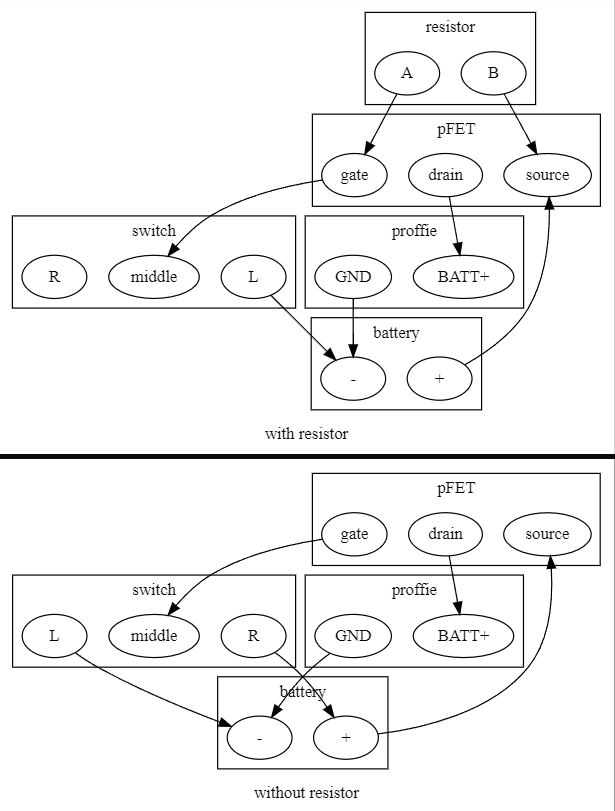
So I tried both setups in this drawing linked by Profezzorn both with resistor and without and they both behave the same. Once you’re done with the saber it’s necessary to power off the blade before flipping the kill switch

Here’s some links for exactly what I’m using
-Link to breakout board from Profezzorn (proffie creator)
https://oshpark.com/profiles/hubbe
–Link to mosfet/ shottky diode
https://tinyurl.com/yu8dk4xb
Mouser part# 78-SI2365EDS-T1-BE3
—Link to smd 100k Ohm resistor
https://www.mouser.com/ProductDetail/71-RCG0603100KJNEA
Mouser part#71-RCG0603100KJNEA
That’s not how that circuit is supposed to behave.
Maybe drain and source got mixed up in my diagram?
I assume you mean as far as when power is killed via the switch with a lit blade it should discharge all power instead of leaving a dim blade as seen in my video?
This is the breakout board I used. I ordered these prior to finding your breakout board but I plan on using yours for the install. I’m sure it doesn’t make a difference but just to rule out any possibility of it making a difference
https://oshpark.com/profiles/SquantMuts
Update: The flame has been installed and I’m not seeing any of the problems as stated above using the pfet breakout board fredrik shared. I couldn’t be happier with how this saber turned out and I hope you all enjoy the short video here
2 Likes
I whish I had you skills! Did I count 4 ( maybe even 5) different buttons ?
Your right, it has 2 momentary switches and 2 latching switches
1 Like
![]()


