I just watched a video about helicoil, so obviously I’m an expert now…
It seems to me that for helicoil to work properly, you have would need to tap with something that has the right threads/mm. In the video I saw, helicoil came in a kit which included taps and tools for inserting the coil into the hole.
Or is this not a concern, does tapping with M3 just work for an M2.5 screw?
I have no idea - just going off Rogue Child’s comment about tapping one size up. IDK if that means helicoil is designed to thread into the next size up, to accommodate a screw equal to its size. So like an M2.5 grubscrew screws into an M2.5 helicoil, which in turn is threaded into an M3 thread hole…(?) Since helicoil would make the thread hole smaller maybe that’s how it works
Maybe the outside of the M2.5 helicoil threads into the M3 thread hole, and the inside of it takes the M2.5 screw
Helicoil is just a cleverly designed spring though.
It’s not a molded piece of metal, so I don’t think it can have different thread pitch on the inside and on the outside.
Well I managed to tap a new threading hole for the retention screw and so far so good. Seems to secure the blade pretty well with a few fairly easy turns so not too concerned about re-stripping for the time being. Worst case if it happens again I can afford another size up, and maybe then I’ll revisit the helicoil route
Welll that didn’t last long… the new thread hole re-stripped. I think it’s because my first tap attempt I pulled the tap out all the way because it got stuck… and starting over caused overlap on the initial line of new threading.
What’s tricky is that it seems to get stuck to where twisting just causes the wrench to spin around the tap itself, while the tap is jammed in the thread hole (no matter how hard I tighten the tap into the wrench). The grip just doesn’t seem to be there but maybe it’s because I didn’t back it out regularly to free up the debris…
Ordered another size up for the M3.5 tap and a helicoil/thread insert… but tbh I’m a little nervous about tampering with it too much. It’s one thing when I messed up electronic components that I could order replacements… but messing up the hilt itself… that’s another story. Might consider finding a repair service of some sort if it’s out there.
Or maybe I can get a sample piece of aluminum to practice on and get the procedure right
I’m a dunce. Just checked my tap and see that I totally put it too far in the wrench to the round part, rather than securing it at the square base. Put a fork in me.
On that note I do have a separate helicoil tool coming with the inserts, along with an M3.5 tap. Also used the lube. Now that I can see my screw-up though maybe I can try one more time to thread it properly and hold off on playing with the helicoil inserts. Its basically stripped at the top where I started the tapping, since I removed and re-inserted a couple times.
A tap is not like a bit. Bit’s drive the waste out of the hole you’re drilling so you don’t have to back off too often. With a hand tap, you just get the first couple of turns, then back off completely and clear the threads of the tap of any debris.
Then with no pressure, rethread the tap in the threads you started. Repeat, increasing depth each turn and fully removing the tap and cleaning it. If you have a pipe sitting around it’s not a a bad idea to practice, like getting a proto board to get used to soldering.
I use this method on copper and other soft metals regularly. My first few tries were not so pretty
So to answer my own question here after playing around with it for a while, I believe the distinction is that there’s specific Screw Thread Insert (STI) taps, distinct from (I guess) regular taps depending whether you’re using heli coil or not. So if I want to screw in an M3.5 grub screw into a thread hole by itself, I need an M3.5 tap. But if I want to screw in an M3.5 grub screw with heli coil, then I need an STI M3.5 tap.
Thinking I’ll tap out an M3.5 thread hole for now and see if I can manage that without re-stripping. And if it happens again then I’ll try the heli coil, since I already have the kit on hand with the STI M3.5 tap.
Practicing with the heli coil, hard part is cutting it to length. I guess you’re not really supposed to cut them, but they don’t come in small enough sizes. I use wire cutters, but I still have to bend the spring loops to get in there… need something that can slip between the loops without warping the spring wire too much. Otherwise it seems to be a pretty secure threading option…
For cutting, I would recommend a chisel, or a screwdriver over a steel surface (ideally an anvil), then hit the back of the semi-sharp object with a hammer. Use painters tape to hold the spring in place, or you might never find it. Just don’t use a tool you care about, but it’s likely to get damaged in the process.
The other possibility would be a dremel cutting wheel, but holding the spring while you cut it might be tricky.
Well the M3.5 is tapped in now so hopefully that holds for now I do have to say though this seems like the biggest flaw to the design of these sabers. Maybe part of it’s attributable to human error of over-tightening, but with aluminum being a soft metal, and that soft metal having tiny threads for grub screws intended for regular tightening/untightening… taking pressure against the blade retention… seems like it’s bound to break down eventually, and stripped threading is an inevitability. Surprised they don’t have a design with more secure mechanisms for blade retention.
Significant amounts of thought and experimentation has gone into finding a better solution, but so far they always come out complicated, bulky and/or don’t work well. It’s not an easy problem unfortunately.
Can confirm this setup still works well.
Blade hold is very good and ive yet to have one move enough to disconnect from the pogo pins.
Atyer using O-Rings had its limitations so i moved the design over to using 3mm square silicone cord and this gives a much improved hold when conpressed
You all should tag me so I can see someone needed a reply (sooner).
*In case you decide to go ahead with the repair if the retap fails:
A helicoil is designed so as I said above, you retap the hole using the appropriate 1 sized up (matched) tap for the correlating helicoil that’s to the existing size and pitch you’re repairing. Metric versions are available, ya just gotta look for em. Also to clear the air here in case anyone else searches this topic here goes.
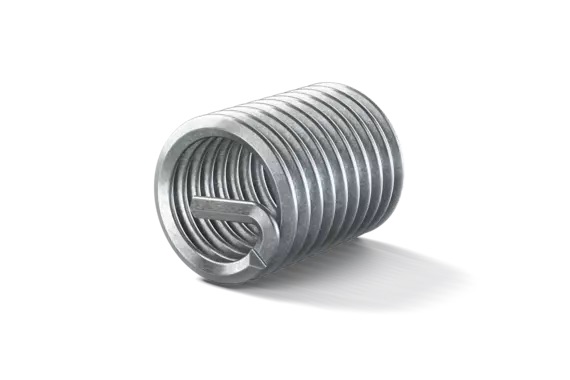
@profezzorn by “break the installation handle” as the instructions indicate (yeah that’s worded very badly and nowhere near the proper phrasing) the insert has a piece that is directly centered and goes across the round’s axis point. The tool’s teeth “grab” onto it in very similar fashion to a tire valve core tool. You thread the helical insert in and then tapping on the back of the installation tool break that axis piece off thus removing it and allowing full use of the repaired threads. If you look at the image you can see where the material has a pinch-point that’s the stress-riser where the break will occur. It’s honestly really simple stuff to use and it very effective in machining work for all sorts of different needs and loads. I’ve seen them on NASA gantry heat shields as well as engine blocks. All held up.
*I know images aren’t usually allowed here but as this pertains to this specific type of repair method it’s warranted and it shows the break-off axis piece you remove.
Basically, this is meant to fight one of my pet peeves; which is using images to convey text. Every time someone does that I throw up a little in my mouth.
Thanks for getting back what I found was that the helicoil kits typically come with the appropriate tap needed. Basically there’s the M#.# tap for the corresponding screw, and then there’s the STIM#.# tap for using same screw size with helicoil/‘screw thread insert.’
So far my re-tap is holding up, and just trying not to over-tighten.