Here you go, good sir.
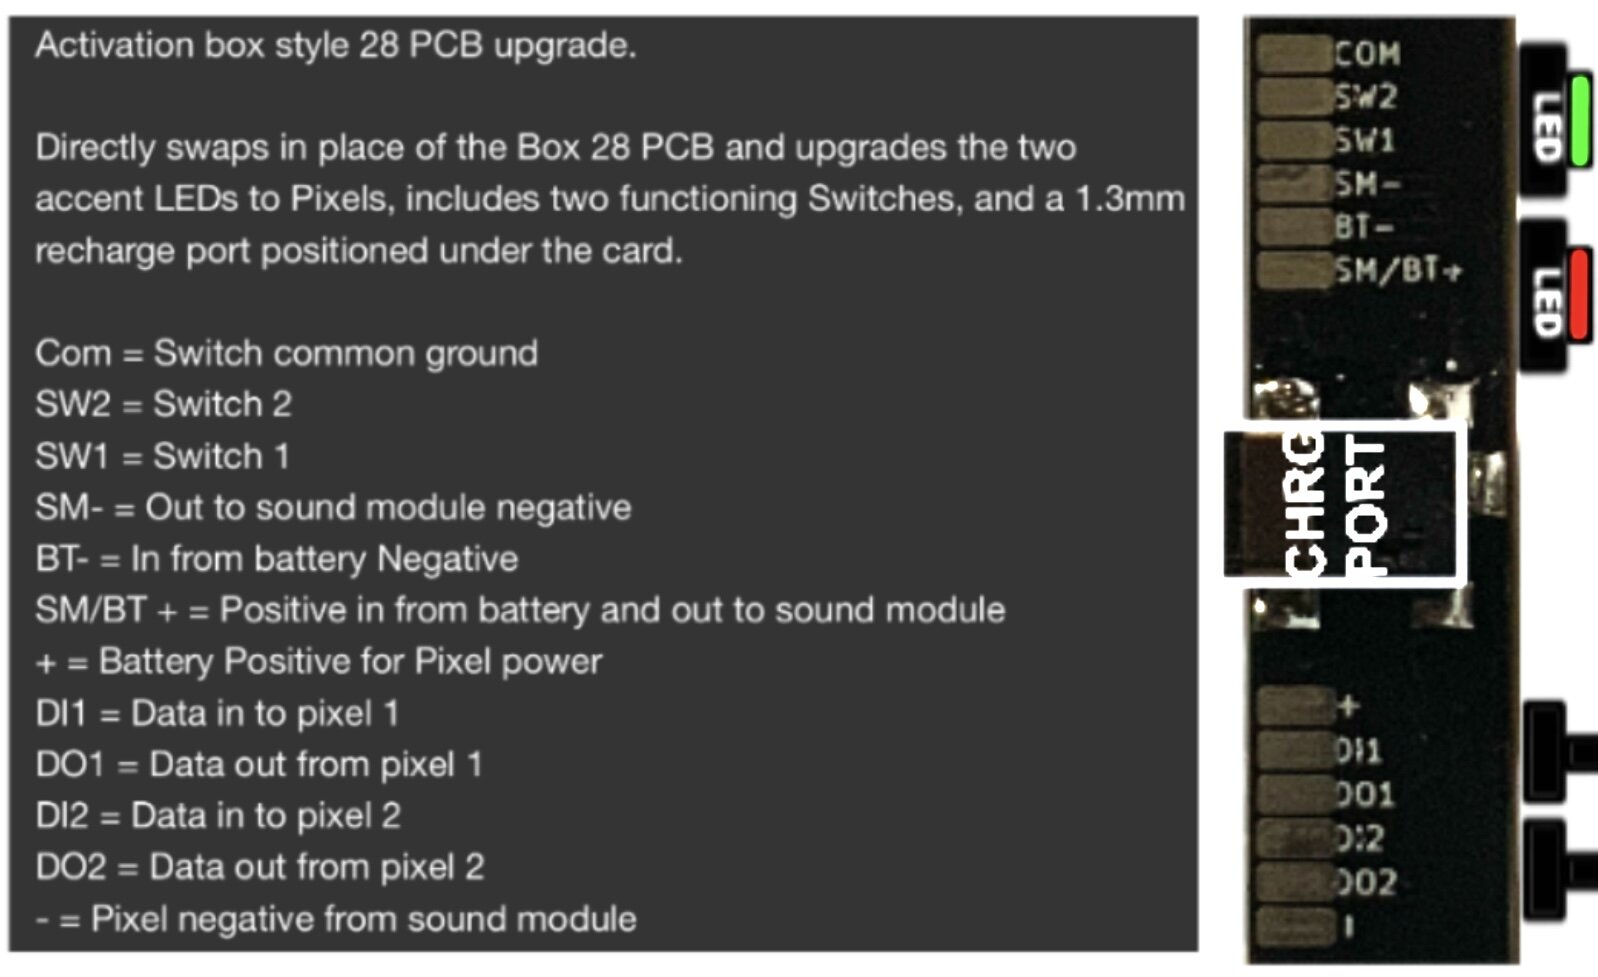
The ‘PCB’ is a direct swap with the original. Wiring to the PCB seems easy enough. I guess I mostly need help with options on how to wire and config the 2 pixels into a proffie to mimic the flashing red and green lights in the deleted scene. The chassis is all scratch build by your way.
If you take @NoSloppy 's code and drop it in the style editor you can see the effect. Does that work for you? The first pixel in the series blinks red, and the second pixel is green.
So power to the pixels goes to + and - respectively, and the data can go board → DI1, then a little jumper can go from DO1 → DI2. Pixel 1 will be red, pixel 2 will be green if you are satisfied with NoSloppy’s fix (which is pretty great).
1 Like
Thanks. I haven’t tried yet but I will hopefully tonight. Thanks guys. This forum is gold.
1 Like
Ok, I copy pasted the code into the style editor and it works perfectly. Thanks guys I will use this code. Cheers.
Question: where in the config file do I place this code? Thx
Do you have a basic config to post? Like everything with proffie, it depends on your choices.
Yes so, here’s my basic config:
I just don’t know where to insert the code in here.
#ifdef CONFIG_TOP
#include "proffieboard_v2_config.h"
#define NUM_BLADES 3
#define NUM_BUTTONS 2
#define VOLUME 1000
const unsigned int maxLedsPerStrip = 193;
#define CLASH_THRESHOLD_G 1.0
#define ENABLE_AUDIO
#define ENABLE_MOTION
#define ENABLE_WS2811
#define ENABLE_SD
#endif

#ifdef CONFIG_PRESETS
Preset presets[] = {
   { "TeensySF", "tracks/venus.wav",
    StyleNormalPtr<CYAN, WHITE, 300, 800>(),
    StyleNormalPtr<CYAN, WHITE, 300, 800>(),
    StyleNormalPtr<CYAN, WHITE, 300, 800>(), "cyan"},

    StyleNormalPtr<BLACK, BLACK, 300, 800>(), "Battery\nLevel"}
};
BladeConfig blades[] = {
 { 0, WS281XBladePtr<144, bladePin, Color8::GRBw, PowerPINS<bladePowerPin2, bladePowerPin3> >(),
    WS281XBladePtr<2, blade2Pin, Color8::GRBw, PowerPINS<bladePowerPin4, bladePowerPin5> >(),
    WS281XBladePtr<2, blade4Pin, Color8::GRBw, PowerPINS<bladePowerPin6> >()
  , CONFIGARRAY(presets) },
};
#endif

#ifdef CONFIG_BUTTONS
Button PowerButton(BUTTON_POWER, powerButtonPin, "pow");
Button AuxButton(BUTTON_AUX, auxPin, "aux");
#endif
You’ve got 3 blades so each preset will need three styles. In this case they are all the same as in:
StyleNormalPtr<CYAN, WHITE, 300, 800>(),
StyleNormalPtr<CYAN, WHITE, 300, 800>(),
StyleNormalPtr<CYAN, WHITE, 300, 800>(),
The top line is the style code for blade 1,
blade2,
blade3,
That will make all of your LEDS cyan.
Whichever blade designation your new leds have, that line gets replaced by NoSloppy’s code.
I’m guessing blade1 is the main blade, blade2 is the crystal chamber, and blade3 is the new clamp. But you have to specify ![]()
Yes, you guessed correct. Blades as such.
The color cyan is a blade, this is just an example for a color?
The cyan is part of the blade style.
To start learning styles there’s a few ways.
Perhaps the most convenient way is to use Fett263’s style library. His endless mix and match variations in OS6.9 are great and soon he’ll drop an OS7 library (I’m staying tuned).
If you want to try building styles from scratch or modifying existing styles, go with the Profezzorn’s editor
Soon I sense the force will lead you to props and defines as well. Fett263’s site can help with all of that. Although there are other props (which setup your controls) that have advantages you may like. The config you posted had no prop defined, so you’ll need a proper prop.
As you go along you can post general style building questions in the right spot on the forums.
Meanwhile, it seems you’ve got a plan for your new PCB.
Thanks master…yup. I’ve got a lot to learn on confid side. It’ll be fun.
hello again. could this same code be used for 2 pixels as subBlade?
They would each get their own blade style then.
Something like:
// Red Arrow Blinks when blade is ON
    StylePtr<InOutHelper<Blinking<Black,Rgb<130,130,130>,1500,500>, 1, 1, Sequence<Rgb<130,130,130>, Black, 200, 30, 0b0000000000000000,0b0010101010101000>>>(),
// Green Arrow
    StylePtr<InOutHelper<Rgb<85,85,85>, 1, 1, Sequence<Rgb<85,85,85>, Black, 200, 30, 0b1010101010101010,0b1000000000000000>>>(),
1 Like
I see. Thank you, master Jedi.
NoSloppy, and others, thanks for all your help. I’ve been able to complete my build. It was a real learning experience.
2 Likes